Authentication
Authenticating a MydexID
A member who has registered a MydexID can use that MydexID to login to applications that support the OpenID Connect protocol.
For an overview of how the OpenID Connect protocol works, please see this page.
Your application (in OpenID Connect, this is referred to as a Relying Party or RP) is responsible for access control to their services. In other words, Mydex can provide authentication but you must decide and manage what an authenticated member (client, customer, citizen, member of staff) can do within your application.
There are a number of ways access control and feature access permissions can be implemented, and each organisation’s context will be different depending on the applications using the Mydex Single Sign-On environment. Examples are use of a corporate approach to directory services e.g. use of an LDAP compliant directory or application specific access control.
Authorization Code Flow
Authenticating a MydexID involves using one of the OpenID Connect specification's 'flows'. The Authorization Code Flow is the most common flow, and is probably the flow your RP should be using. It consists of the following steps:
- Client application or Relying Party (RP) prepares an Authentication Request containing the desired request parameters, including the OAuth2.0 Client ID and Secret, the requested scope/claims, and the URL of the Mydex OpenID Provider (OP), all of which Mydex provides you.
- RP initiates the request in its login route, which causes the member’s browser to redirect to the OP.
- OP validates the RP’s request, and redirects the member to the Login & Consent application.
- The member submits their login credentials and the Login & Consent app validates these against the IDaaS API.
-
If the credentials are correct, the OP stores information about the member (such as their MydexID) in the UserInfo endpoint,
and then redirects the member back to the RP with a one-time
code. -
RP uses the
codeto 'exchange' it for an Access Token and/or ID Token from the OP’s Token Endpoint. - RP uses the tokens to inspect the UserInfo endpoint, where information such as their MydexID is found. With this information, the RP can use it to treat the member as authenticated and personalise their experience in the app.
Setting up an application to perform authentication
The first step is to request OpenID Connect credentials from Mydex via the Connection Manager, whereby you advise Mydex of your application's URLs for login and logout, and other information as required.
Once you have requested and been issued your OIDC client ID and secret from Mydex, you can use these in your OpenID Connect-capable application to initiate the login flow with Mydex's OP.
When the RP wishes to Authenticate the member, or determine whether the End-User is already Authenticated, the Client prepares an Authentication Request to be sent to the Authorization Endpoint.
Mandatory OpenIDConnect scopes
Mydex currently requires the ‘mydexid’ scope in addition to the ‘openid’ scope. (You can then fetch the ‘mydexid’ as a claim via the UserInfo endpoint, at the completion of the flow).
Optional OpenIDConnect scopes
Mydex can also assign your OIDC client the ‘email’ or ‘phone_number’ scopes if your application and use case requires it.
If your application requires that the member MUST have set up Multi-Factor Authentication (MFA) to use your service, an additional scope ‘mfa:mandated’ is available.
If your application is participating in Mydex's 'anonymous identifiers' service, an additional scope ‘identifiers’ is available. Contact us for more information about this feature.
Note: In future, Mydex may add other representations of the member's PDS datasets that your connection may have been granted access to, as a claim, but these claims will not represent the data itself, just a form of consent statement. The data must always be requested by your application via the Personal Data eXchange API with a Connection Key per the standard Mydex PDS model explained elsewhere on this website.
Python example of performing OpenIDConnect Authentication flow
Mydex has prepared an example application using Python, which demonstrates authenticating a Sandbox MydexID to the Mydex Sandbox OpenID Connect server. Click here to view the app in our Developer API Examples git repository.
To visually understand the OIDC flow, please see the flow diagram below.
Flow Diagram of Mydex OIDC Login
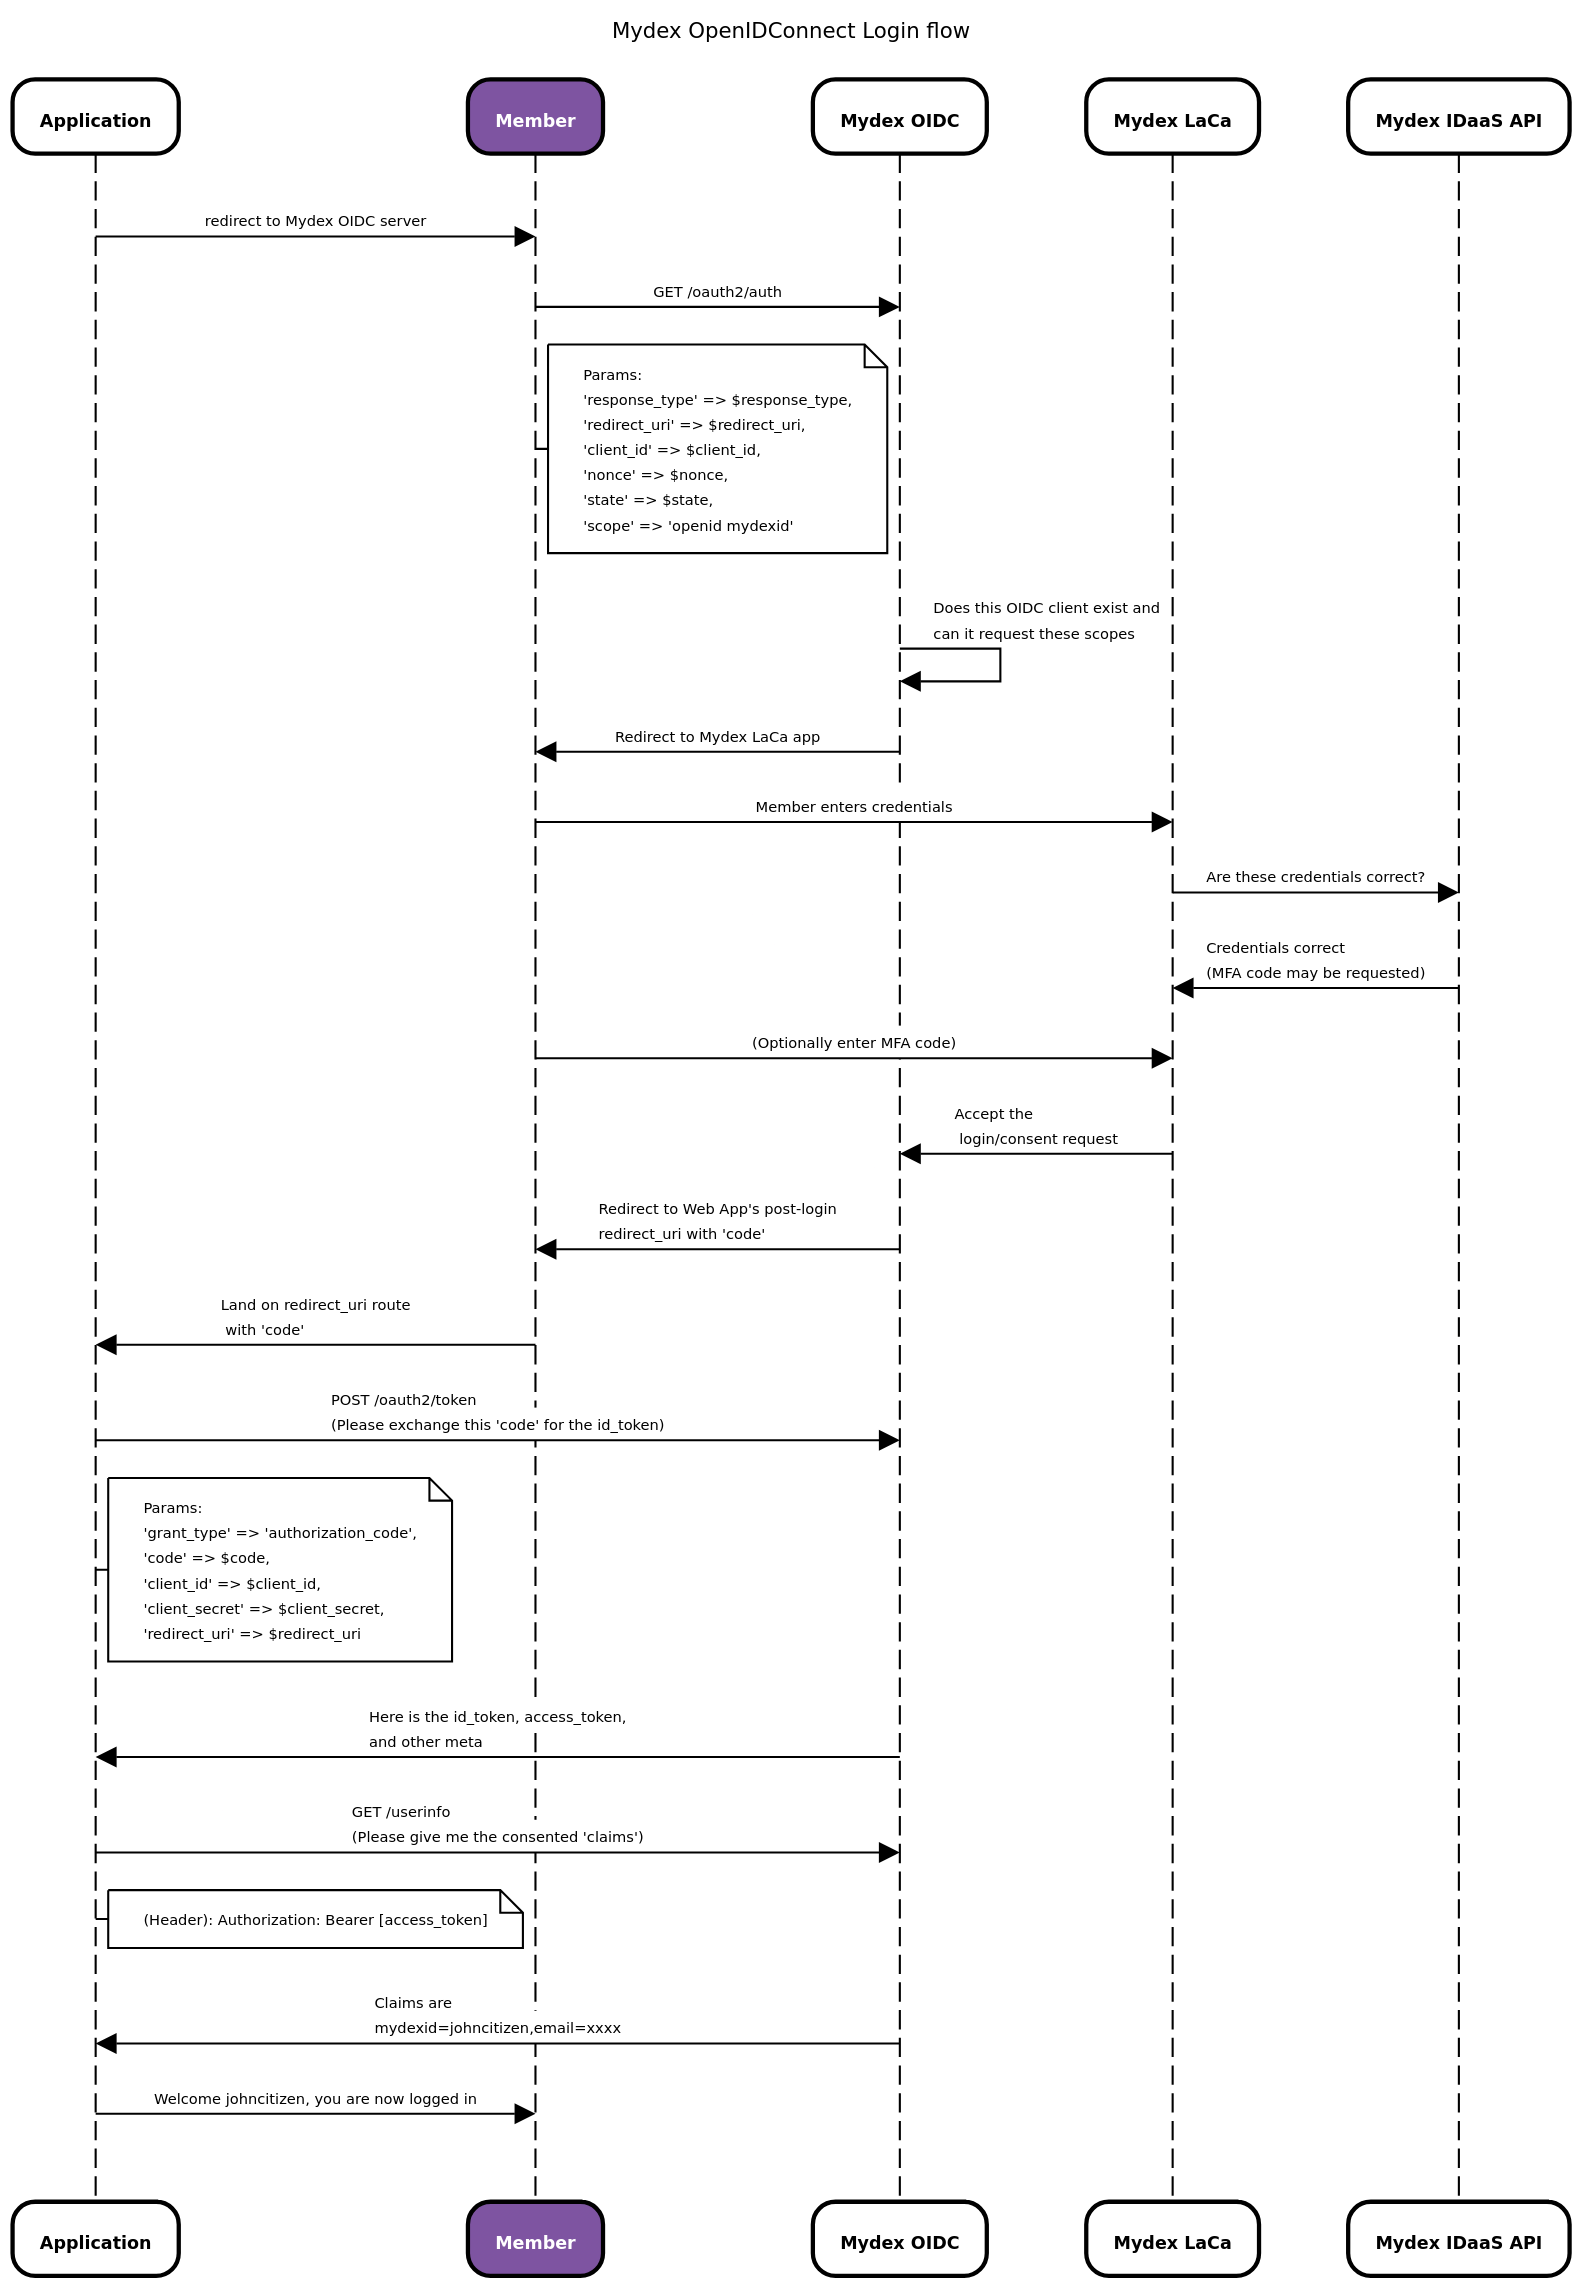
The Mydex Login and Consent application (LaCa)
In the flow diagram above, the Mydex LaCa is the Login and Consent application. This is where the member is taken to enter their credentials (and optionally, MFA code) as part of the authentication flow.
This application runs in the Mydex Safe Secure Cloud. You do not need to redirect or link to the LaCa in your application - the Mydex OP automatically redirects the member to it if they are not already authenticated.
Customising the Login form
By default, the login form on the LaCa reflects the familiar Mydex brand in terms of its style, as shown below:
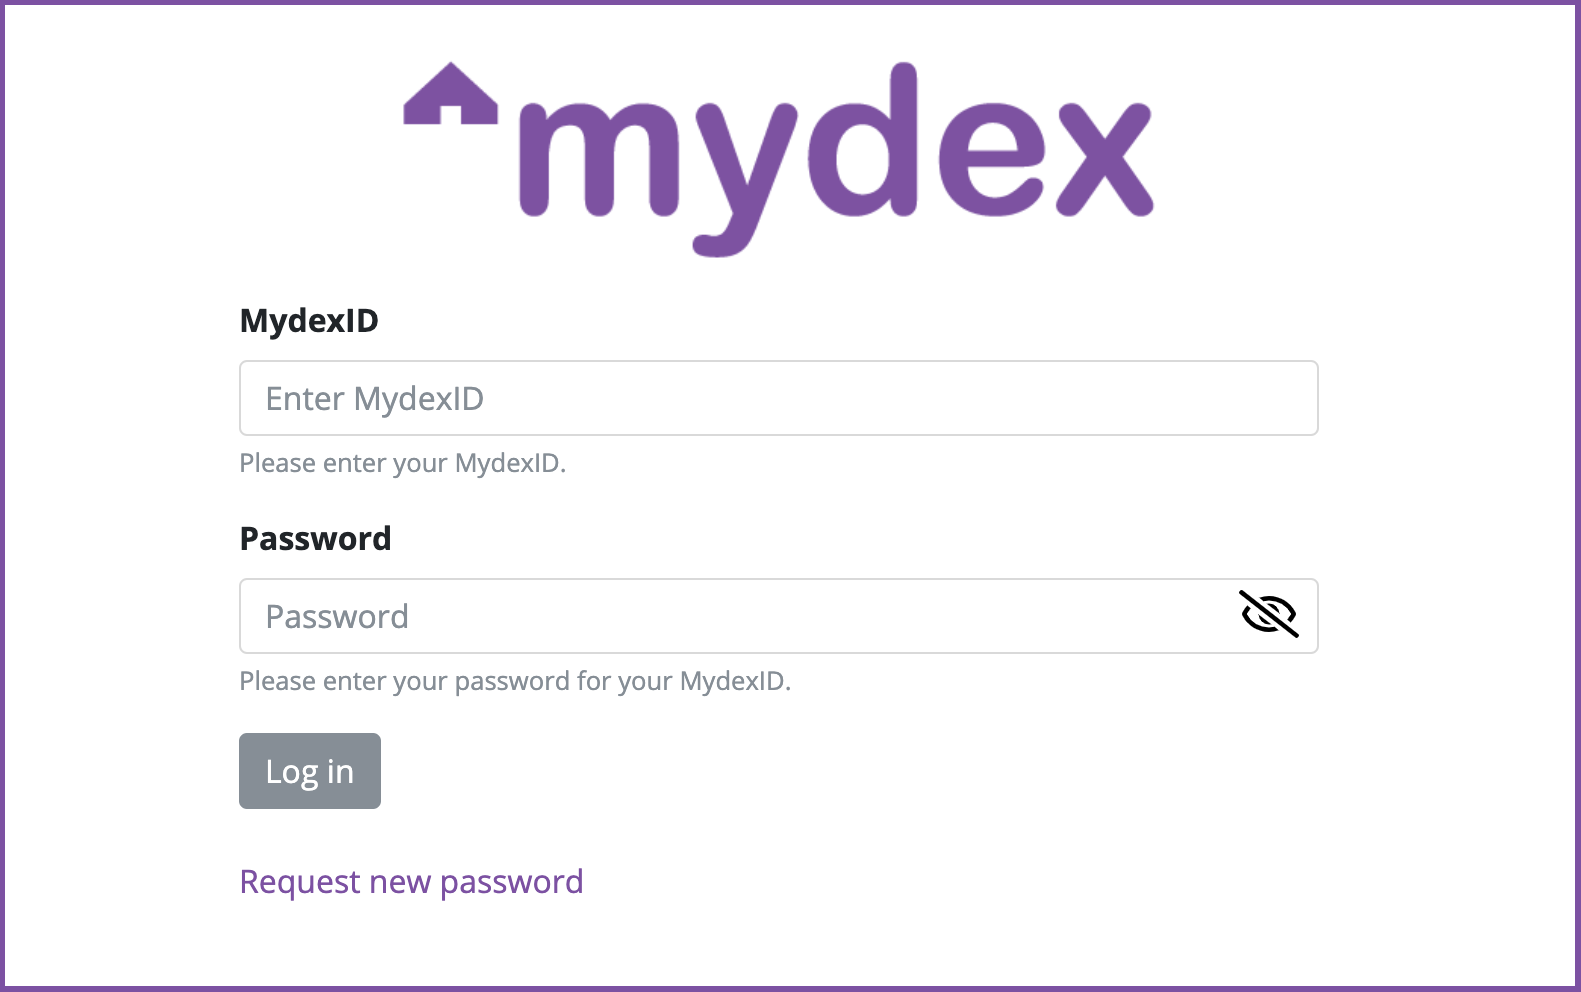
To ensure a consistent, pleasant experience with your RP, Mydex offers the capability to completely customise the login screen to match your application or organisation's style guide. This is done by linking your OIDC Client to a pre-prepared set of HTML templates and CSS, which are served by the Mydex LaCa instead of the default form.
It is the responsibility of the Subscriber to provide Mydex with the appropriate assets. Mydex will then ensure the form submission elements point to the right place.
Please contact us to further discuss these options.
Handling logout in your application
RP-initiated logout
When a member clicks Log Out in your RP, two things should happen in your application's logic:
- You should end your own application's session for the member, specific to your own application's needs.
- You should perform the OpenID Connect RP-initiated logout flow to end the member's SSO session at the Mydex OP (otherwise, revisiting your application will seamlessly log them back in due to the active OIDC session). To do this, initiate a logout request to Mydex's OpenID Connect 'end session endpoint'
/oauth2/sessions/logout. Mydex recommends sending the ID Token as theid_token_hintquery parameter in this request.
After the RP-initiated logout flow completes, the member is redirected to your application's post-logout-redirect URI which you provided to Mydex when requesting your OIDC client. Often this is the front page of your application, but you could redirect to a page that performs the 'end application session' action (the first item in the list above), if you wanted to handle this after the RP initiated logout instead of beforehand.
Single-Sign-Out using front or back-channel logout flows
Mydex's OpenID Connect service supports front-channel and back-channel logout flows, per the OpenID Connect specification. Of the two, back-channel is the recommended option for you to implement if you can support it.
In most cases, you should aim to support just one of the two logout flows. You do not need to support both. Doing so may even create confusion or race conditions in your RP, because OIDC will attempt to end the session via both methods, and only one can succeed.
Back-channel is the more secure and robust method because it means it can succeed even if the member's browser has closed (perhaps the member has closed the browser but then logs out of their MydexID via a mobile application - only backchannel can succeed then ending the session they opened in your RP in their browser earlier). Front-channel requires loading your application in an iframe in the member's browser, and iframes are increasingly deprecated in today's modern web architecture, or may not be possible for your application to support.
Front and back-channel logout ensures that even if the member initiated Single Log Out from an RP other than yours, your app correctly and transparently ends the member's session on your website automatically, thereby protecting their data from continuing to be accessible in their browser.
If you provided either front-channel or back-channel URLs when requesting your OAuth2.0 client via the Connection Manager, Mydex's OP will make a request to those relevant URLs if the member initiates a logout request from your Client app, or even from another participating RP that uses Mydex's OpenID Connect service.
This is so the member can achieve ‘single logout’ from any app without having to log out from each app individually - considered a security feature of the OpenID Connect specification.
However, if you don't provide any front- or back-channel URLs when requesting your OAuth2.0 Client, your application won't participate in the single logout process.
If you are participating in front- or back-channel logout, you should also have another route that answers on those URLs, which does some sort of session destruction in your Client app, but does not initiate signout with the OP.
Front- and back-channel routes are not intended to be visited by the member explicitly - in other words they operate almost like API routes even if the member had not consciously opened your webapp in their browser.
Note: if you opted to support front-channel logout, your application must be able to be loaded as a HTTPS GET request in an iframe by the OP. Ensure that your Content Security Policy and/or X-Frame-Options headers allow the Mydex OP URL so that the member's browser is able to load your app in an iframe in their browser.
If you opted to support back-channel logout, remember that the OP makes a direct HTTPS POST request to your back-channel URL as a server-to-server request (not via the member's browser). This means that your back-channel logout URL must be reachable over the public internet from the Mydex OP (it can't be behind Network Address Translation or other firewall restrictions that prevent direct access).
Taking it Live
Once you know your application is working correctly with OpenID Connect in the Sandbox, you can request an OAuth2.0 Client against the ‘live’ environment, via the Mydex Connection Manager. If you wish, this request can be with the same URLs as the site you used with the Sandbox, but it will still need to be a separate request.
Mydex will issue you another Client ID/Secret keypair for use with the live environment.
The process should work the same as above for the live environment, but just with https://op.mydexid.org rather than the https://sbx-op.mydexid.org URL.